At the end of 2015, DVDFab takes a big action that rolls out the first complete Cinavia removal solution: DVDFab CinaviaRemoval HD. All the time, DVDFab CinaviaRemoval HD is kept updating to add more and more medias in its supported list. Now, DVDFab has entered into v 9.2.3.9, and DVDFab CinaviaRemoval HD has gone through around seven iterations and supports more than 60 Blu-rays protected by Cinavia including The Hunger Games: Mockingjay, Fast and Furious, Jurassic World, etc.
Once you loaded a Cinavia affected Blu-ray that DVDFab CinaviaRemoval HD supports in, it tell detect in the seconds of loading process, and tell you there is embedded Cinavia audio stream, and provides you the best solution to remove it. Follow it, the smart Cinavia removal software that considers all the necessary things you may take into consideration, you will easily make the annoying Cinavia restrictions clear, and play your favorite Blu-rays with any player you want. Besides, combined with DVDFab Blu-ray Ripper, you can rip the Blu-ray with which the Cinavia audio tracks removed by DVDFab to almost all targets you need, including all the mainstream video and audio formats, and devices in support of video playback.
Definitely, the Cinavia removal process is impressively easy. Follow me to review the detailed steps about how to make it with DVDFab CinaviaRemoval HD in case you aren’t sure about it.
Step 1: Run the latest DVDFab 9, and get Cinavia Removal feature enabled
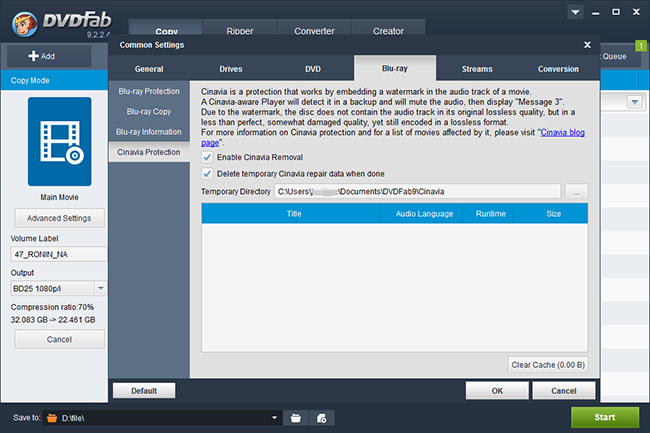
Run DVDFab 9. Before using Cinavia Removal HD, you need to get the Cinavia Removal feature enabled. It is super easy, just move to the top right corner of the interface and click the reverse triangle of Common Setting, then go to the Blu-ray tab, and tick the related two options.
Step 2: Load the Cinavia protected Blu-ray disc, and remove the Cinavia affected audio
There may be little difference depending whether Blu-ray Copy or Blu-ray Ripper you are using. If you use Blu-ray Copy, please choose Main Movie. If you use Blu-ray Ripper, then just choose the profile you need.
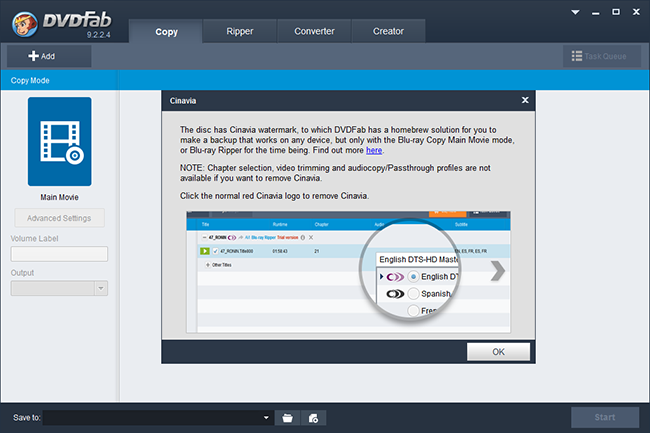
Next, insert the Cinavia protected Blu-ray disc into the Blu-ray drive, or navigate it through the Add buttons on the main UI. You can also simply drag & drop it into the main UI if it comes to be an ISO file or a folder. Then, a window with that message will come into your sight:
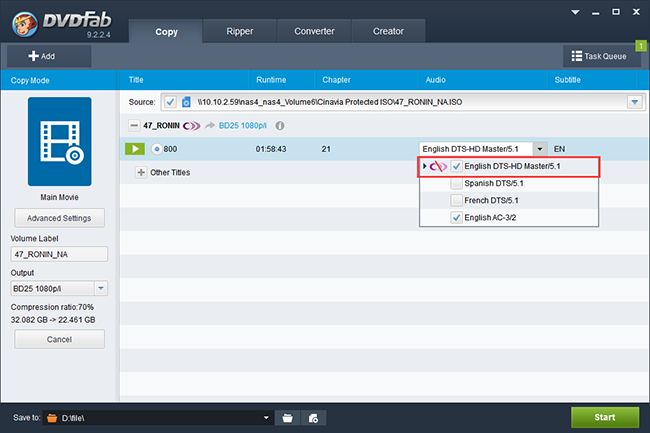
After the source loading, move to the audio track section. Select the audio track protected by Cinavia, and click on the Cinavia logo until there is a red slash across it. Usually, DVDFab has selected both of them for you by default. And note that you can only remove one Cinavia protected audio track once. To remove the following Cinavia protected audio tracks, just repeat the Cinavia removal tasks for other Cinavia protected audio stream.
After that, select the output titles, subtitles, output size you need and select the output directory at the Save to part.
Step 3: Start to remove Cinavia protection
Now that you’ve selected the Cinavia protected audio track and set it to be slashed, then just begin the task to remove the Cinavia protection. Once the Start button at the bottom right corner is hit, the Cinavia removal processing is started. The processing doesn’t require a long period of time, and after it is finished, you will get a lossless PCM audio track with the quality almost the same as the original one.
DVDFab CinaviaRemoval never stop being developed to support more and more medias including the coming-soon DVDs so as to become more and more practical and considerate in helping users clear the way to viewing Cinavia stops.


Add Comment